What is a Stopcock Valve?
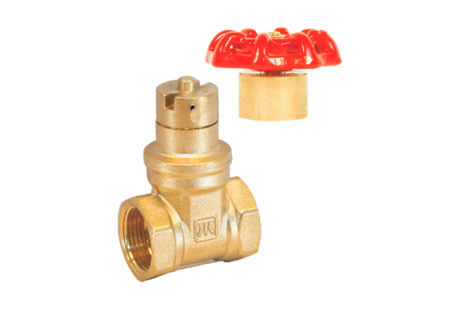
A stopcock valve is a valve that controls fluid flow by rotating a valve core. It mainly consists of a valve body, a valve cover, and a valve core. The valve core is usually a cylindrical part that can be rotated manually or by an electric device. When the valve core rotates, the fluid passage changes accordingly, thus controlling the fluid flow and pressure. The 15mm stopcock valve is commonly used in corrosive, highly toxic, highly hazardous, high-viscosity environments, or environments with suspended particles where leakage is strictly prohibited. The lining material can be selected based on the operating temperature and working medium. It has advantages like low friction between sealing pairs, flexible operation, long service life, bidirectional fluid flow, and unrestricted installation direction throughout the operating process.
JINTIAN's 15mm Stopcock Valve Major Technical Parameters
Nominal Pressure: 0.6~1.6mpa
Applicable Temperature: 0~100℃(varies depending on the maximum operating temperature of the lining material)
Body Material: BRASS, WCB, CF8, CF8M, CF3, CF3M;
Product Design and Manufacturing Standards: GB/T12240;
Inspection and Test Standards: GB/T13927;
Structural Length Execution Standards: GB/T12221;
Applicable Medium: Water.
JINTIAN's 15mm Stopcock Valve Working Principle
The core component of the stopcock valve—the valve core—is usually a cylindrical part that controls the fluid passage by rotation. The gap between the valve core and the valve seat can be adjusted to achieve different levels of flow control. The advantages of stopcock valves are their simple structure, ease of maintenance, and reliable operation. They provide good sealing performance, effectively preventing fluid leakage. Additionally, stopcock valves can open and close quickly, widely used in industrial liquids and gases control systems and are suitable for frequent operation scenarios.
JINTIAN's 15mm Stopcock Valve Advantages
Stopcock valves are particularly suitable for scenarios requiring frequent operation due to their fast and lightweight opening and closing characteristics, efficiently meeting the need for rapid opening and closing.
Stopcock valves have low fluid resistance.
The structure of stopcock valves is simple, they are relatively small in size, lightweight, and easy to maintain.
Good sealing performance.
Not limited by installation direction, the flow direction of the medium can be arbitrary.
No vibration, low noise.
Installation and Maintenance
Choose a suitable position: When selecting the installation position of the stopcock valve, consider ease of operation, maintenance, and inspection. Also, pay attention to the compatibility with other piping equipment and the surrounding environmental conditions.
Check dimensions and connection types: Before installing the stopcock valve, verify that the valve dimensions and connection types meet the actual requirements. Ensure a tight connection between the valve and the piping, and use suitable sealing materials.
Clean the pipeline: Before installing the stopcock valve, thoroughly clean the inside of the pipeline to ensure no residues or impurities. This helps prevent blockages and improves valve efficiency.
Properly install the sealing parts: When installing the valve, correctly install the sealing parts to ensure good sealing performance between the valve seat and valve core. Check for damage or aging of the sealing parts and replace them promptly if necessary.
Adjust the drive device: If the stopcock valve uses an electric or pneumatic drive device, adjust and set it according to actual needs. Ensure good coordination between the drive device and the valve to properly control the opening and closing operations of the valve.
Follow these steps when disassembling and assembling the stopcock valve:
1. Shut off the fluid medium: Before starting to disassemble the stopcock valve, ensure to shut off the fluid medium supply to ensure no fluid flows inside the pipeline.
2. Remove the valve cover: Use suitable tools to loosen the valve cover bolts one by one and take off the valve cover. Do not use excessive force to avoid damaging valve components.
3. Remove the valve core: Gently pull out the valve core, being careful not to get injured or let the valve core collide with other objects. Check for wear or corrosion on the valve core surface, and repair or replace if needed.
4. Clean valve components: Clean the disassembled valve components to remove deposits and impurities. Use suitable detergents and brushes for cleaning and wipe them with a clean cloth.
5. Assemble the valve: Assemble the cleaned valve components in the correct order. Ensure a good fit between the valve core and the valve seat, and that the sealing parts are properly installed without damage.
6. Tighten the valve cover: Place the valve cover on the valve body and tighten the bolts one by one. Use a torque wrench for proper torque control if necessary.
7. Test valve performance: After assembly, reopen the fluid medium supply and test the valve performance. Check for sealing performance, flow regulation, and pressure control functions. Make adjustments or repairs if any abnormalities are found.
8. Record maintenance information: During the disassembly and assembly process of the stopcock valve, keep detailed records of each step and operation. This information, including disassembly time, maintenance personnel, and replaced parts, helps in future maintenance and management.

 English
 日本語
日本語 한국어
한국어 français
 Deutsch
 Español
 italiano
 العربية
 tiếng việt
 Türkçe
 ไทย
ไทย 中文
中文


